Skip navigation

Tag Archives: HOWTO

I had installed Yoper 3.0 on my PC, without additional software installation option. After installation, I try to add CDROM as channel through smart GUI tool. While selecting CDROM/DVD option in channel selection dialog, it was showing “no local media found!” message. It was applicable for command line smart also. Note: I checked the media, it was perfect with checksum. I attempted the CD with both CD Driver and DVD Combo drive. No use.

To my surprise, “system:/media/hdb” on location bar on konqueror was showing the content of installation media CD. But there was no such directory (/mnt/hdb) available. I confirmed the same with shell. Then I created /media/hdb manually and mounted the CD. that is it! all problems solved. I have installed ykde-standard from CD. Thanks a lot for the wonderful support from Musikolo in Yoper forum!

I keep upgrading my Home PC with better peripherals to make it to breathe better for long time. The recent one is a nVidia Graphics card of model 6200A – 256MB – 8X from Zebronics. I got it from ebay for Rs.2000 ($47) which is 7 months old. Now my PC configuration is

Intel PIII/850MHz, Intel 82815 Chipset, PC133 450MB, nVidia 6200A 256MB, 20+10 GB HDD

I have installed Ubuntu 7.04 (Feisty Fawn) for home productive purpose. Here is the steps I did to install this Graphics card in Ubuntu.

1. Plugged-in the Graphics card in AGP Slot of motherboard. (This card is AGP 8X speed, though my motherboard (Intel 82815) supports upto 4X AGP only. Since nvidia cards are backward compatible, it fits perfect with my motherboard) Connected the monitor to D-SUB connector of this card.

2. Booted the machine. Bios automatically detected the AGP Card and switched over the default display to this card.

3. No GUI desktop login manager. X windows failed due to mismatch between current display hardware and existing /etc/X11/xorg.conf. xorg.conf has entries for Intel i810 driver which is built-in graphics chip.

4. Looking into the xorg.conf, I came to know the following command to reconfigure the X server.

5. $ sudo dpkg-reconfigure -phigh xserver-xorg

6. $ sudo /etc/init.d/gdm restart

7. Just logged into my gnome desktop. At this stage this card is driven by open source driver called “nv”.

8. I wanted to check the power of this card. So clicked System->Preferences->Desktop Effects. I was offered to enable and install proprietory nvidia driver to get better performance. I said yes. It installed “nvidia-glx” driver from restricted repository.Then it prompted for reboot.

9. Upon reboot, it is performing wonderful. I checked both compiz and beryl window managers, both work well.

Note: If Ubuntu is able to detect the newly plugged-in graphics card and configure the xorg.conf accordingly, it would be wonderful. Hope in the future version we can expect it.
I want to share my experience of connecting Mobile with Linux system. The very purpose of this is to take backup of mobile address book. I have tried gnocky (with back end as gnokii) many times without any success. Recently I searched synaptic with Nokia keyword and found that there is a tool called Wammu which works with most of the Nokia models. It works for me too like a charm. gammu is the backend of this tool.

My model is Nokia 6610 with MA620 USB Infrared dongle. This model of mobile communicates with Linux through Infrared dongle. Dongle is detected as /dev/ttyUSB0. Here is a script which maps my mobile at /dev/ircomm0.

#!/bin/sh
#

#Minimal stuff required to get the MA620 USB IrDA dongle #recognised by the kernel. Version 1 — works with unpatched kernel, #but only at 9600bps.

/sbin/modprobe uhci_hcd

/sbin/modprobe pl2303

/sbin/modprobe irda

/bin/echo 9600 > /proc/sys/net/irda/max_baud_rate

/sbin/modprobe irtty-sir

/sbin/modprobe ma600-sir

/sbin/modprobe ircomm-tty

/usr/sbin/irattach /dev/ttyUSB0 -d ma600 -s

exit 0

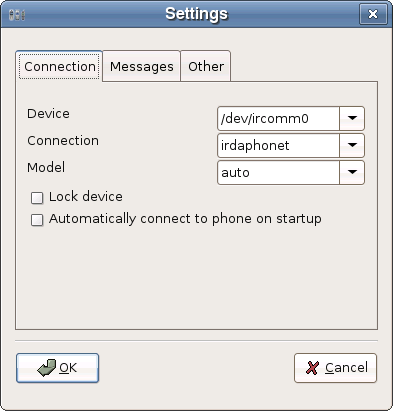
Wammu was able to detect my Mobile proerly. Here is my configuration screen.

screenshot-settings.png

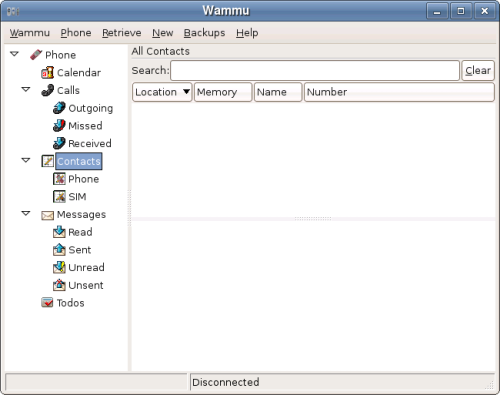
I was able to backup my address book. Sending SMS from Wammu application was also successful. Here is my screenshot of Wammu which says more about the features.

wammu.png

Thanks to gammu and Wammu teams!

I started OpenSUSE 10.2 installation with a lot of expectation (10.1 version was very slow on my PIII/192MB system). My built-in graphics card is not enough to run the installation in graphics mode, OpenSUSE detected the same and run the installation in console based screen. After partitioing and file copying phases, system restarted for second stage of installation. When the system started, YaST2 started in graphics mode but without displaying letters on screen (hope, it did not remember the console mode installation). Then It crashed immediately throwing some segementation fault error and then system continued to boot. Got the login prompt. But what is my root password? I have not yet set. Now I need to manually invoke YaST2 in Second Stage. But it is possible only with root login. What I did?

1. chroo-ed OpenSUSE from DreamLinux installation. Here is a HOWTO on it. I set the root passwd. Then rebooted in OpenSUSE.

2. Logged in as root. I found the YaST2 installer as /usr/lib/YaST2/startup/YaST2.Second-Stage. Executing this manually showed console based YaST2 in second stage. That is it. Just followed remaining installation wizard. It often reported about some source package information not available. I just ignored them. After a long wizard, rebooted the system to get nice GDM login screen.

Additional Note:

OpenSUSE 10.2 has improved its performance from 10.1 considerably. It is working in my PIII/192MB PC at tolerable speed. But it is not usable in day to day production due to its slow response in invoking the application. It has well integrated desktop, wonderful hardware detection, control panel for almost everything on your system, nice looking fonts, etc. If I have a shiny new system I would have gone with OpenSUSE.

As a a traditional UNIX system, Linux systems also followed the static device nodes in /dev directory. During the installation process, /dev directory is filled with most commonly used device files. But modern linux system is not so. While booting the system, the the device nodes are created for the available (only) hardware devices. This makes the /dev not cluttered too much with mostly unused nodes.

But this behaviour results in absence of /dev/<nodes> in chroot-ed environment. This will result in failure of many commands based on /dev/<nodes>. The following is an example of such failure in a chroot-ed environment. In this example, a user tries to change root passwd of chroot-ed system.

dreambox:/# passwd
Changing password for root.
New Password:
Bad password: too simple
Reenter New Password:
Cannot open /dev/urandom for reading: No such file or directory
Cannot create salt for blowfish crypt
Error: Password NOT changed.

passwd: Authentication token manipulation error
dreambox:/#

Here is how to solve this issue:

1. Mount new root partition in a directory. (e.g.): # mount /dev/hda2 /mnt/newroot

2. Bind the current /dev with would-be root. (e.g.): # mount –bind /dev /mnt/newroot/dev

3. changing the root file system. (e.g.): # chroot /mnt/newroot /bin/bash

That is it. This will be useful during rescue process of a system.